An investigation of the pre-delay parameter of the Lexicon 480L reverb plug-in

Reverb is, as you know, an extremely popular and extremely useful effect. It can mellow out a vocal, and help it blend in with the instruments in a mix. It is however important to be able to get the reverb texture that you want as an engineer and producer, and not just add reverb without fully considering how to get the best sound possible.
Here we have a vocal, recorded in Abbey Road Studio 2 using a Violet Designs Flamingo microphone through a Universal Audio Solo/610 preamplifier. You will hear some studio ambience, and some leakage from the backing track in the headphones, both of which are typical of real-world recording sessions.
Regarding the leakage of the backing track, it is interesting to note that the singer has her headphones positioned partially over her hair, which could create an air gap allowing sound out...

In any recording session it is vital to remember that the performance comes first above everything and small technical details should not be allowed to get in the way. Giving the singer anything else in addition to the performance to worry about is often not a good idea. Leakage at this level would not normally be a problem in the mix, unless the producer decided that there should be an acapella section in the song.
Reverb
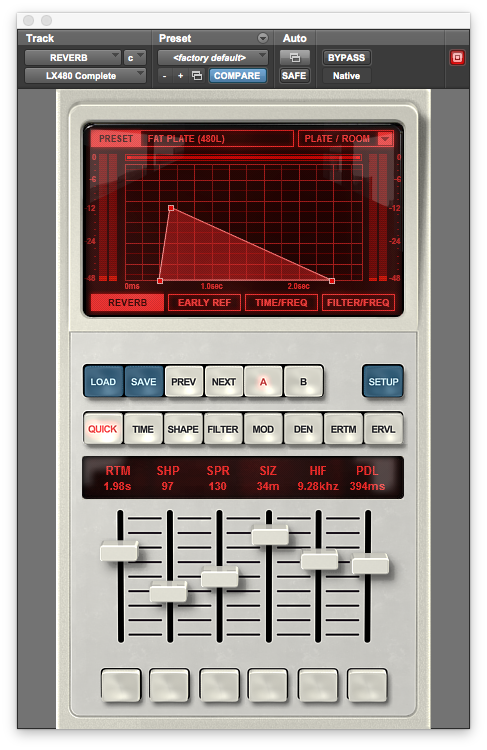
The reverb plug-in chosen for this tutorial is the Lexicon 480L emulation by Relab. The Lexicon 480L is a classic reverb unit dating back to 1986. While modern convolution reverb algorithms might excel in creating realistic ambiences, the 480L has an interesting texture that is well worth getting to know. It is simple to use to, which makes it ideal for the purpose of a tutorial.

Here I have chosen the 'Fat Plate' preset, which demonstrates the use of pre-delay well. The pre-delay control is the one labeled 'PDL' on the far right of the unit. (By the way, in the real physical Lexicon 480L this is just the remote control. The actual unit is a massive rack-mount chock full of digital integrated circuits that represent the technology of the period.)
Here is the vocal with a reverb applied. The level of the reverb is chosen so that the effect of pre-delay is clearly audible, while not being so high that it couldn't find use in a real-life project.
What is pre-delay?
Good question. To answer this properly it is necessary to go back to an even earlier era of reverb when everything was done electromechanically (and there's an earlier era still when it was all acoustic, and that is still a useful technique that we cover in Audio Masterclass). The classic electromechanical reverb unit is the plate reverb. Here is a catalog photo of the EMT 140...

In essence, the audio signal is fed to a driver that makes the plate vibrate, two sensors (in a stereo unit) pick up the vibrations which reflect around the plate. The sound of a real plate reverb unit can be wonderful, so it is well worth emulating in software.
But creative engineers of the period (the plate was the king of reverb from the 1950s through to the late 1970s) experimented with running the signal through a tape recorder before it hit the plate. The gap between the record and playback head created a delay that separated the reverb signal from the dry signal by a time period dependent on the spacing of the heads and the speed of the tape. Although this isn't an effect that you would ever come across in natural reverberation, or at least it is very difficult to think of a scenario, it sounds great! Hence virtually all digital reverb units and plug-ins feature it too.
Let's hear the same preset with a long pre-delay. Why not got to the max! In this instance the maximum pre-delay available is 1.5 seconds, which is far more than is ever likely to be useful, but who knows what a creative person might find to do with it?
In this song, it really is too much. But for dreamy, chillout music it could work.
A more realistic example would be something around 170 milliseconds. The precise timing doesn't usually matter, unless you want to match the tempo of the track.
The effect is subtle, but at the same time meaningful, which is often the case with effects. Good production and mixing is often about blending a lot of subtle factors to create an artistic result.
Here's another example, this time at 394 milliseconds. It's different to the previous example, but still well within the realms of usefulness. Note the change in the graphic, which the original unit unfortunately didn't provide.
What pre-delay achieves
This all sounds nice enough. But what pre-delay gives us is the ability to add more reverb without it getting in the way of the vocal. By separating the reverb from the dry signal we can maintain intelligibility while adding a lovely warmth to the sound. To hear this more clearly I have increased the level of the send to the reverb by 5 dB. There is now quite a high level of reverb that with the preset 2 milliseconds of pre-delay could be considered too much...
But with a longer pre-delay, the original dry signal stands out prominently, here with a pre-delay of 292 milliseconds...
Of course in your real-life project you will need to consider the reverb in the context of the rest of your production, but these examples with the vocal isolated should make the audio effects of pre-delay clear to you.
Summary
Short and sweet - pre-delay is easy to explain and easy to understand. But the simplicity of pre-delay shouldn't lead you to underestimate its effectiveness.
Download the tutorial files...
Note: Reverb can also be added using the natural echo chamber technique...

David Mellor
David Mellor is CEO and Course Director of Audio Masterclass. David has designed courses in audio education and training since 1986 and is the publisher and principal writer of Adventures In Audio.


